Schedule Setup Part 2: Individual Schedules
In Part 1 of the Schedule Setup, we discussed the All Schedule tab. Watch the Schedule Setup, All Schedules here.
The second tab of the schedule setup shows and sets options for individual schedules. Clicking a schedule in the list will display the options for this schedule. You can also delete or create a new schedule from the schedule list. When we click a schedule, you have 4 additional screens that can be accessd: Details, Appointment Types, Emails and Schedule Blocks.
Lets address each of these. First the Details.
There are two types of schedule types in ChiroPractice Pro: Time and List.
The time schedule is a traditional time based schedule with different appointment types, durations and bookings. The List schedule is just that a list of patients without a specific appointment time. With the List based schedule, you don’t have to worry about the other items on this page.
The interval is the minimum time that you want to schedule appointments. It should also be at least the least common denominator for your appointment types.
Bookings allow you to overbook appointments. This will allow you to book multiple appointments for the same time slot. Once the number of bookings hit this number, you will not be able to book any more appointments for this time slot.
The Day width and week width set how wide the schedules are.
The last section is the start and stop times for each day of the week. If you are not open on a particular day, just set the start and end time equal to each other. Also, for days you are open, make sure that the start time is earlier than the end time or you’ll cause an error on the schedule.
Next are the appointment types. This is where you assign appointments for the schedule, like New visits, regular visits, follow-up appointments or Re-exams. You can have unlimited appointment types. To add a new appointment type, click the add new button. To delete an appointment type, click the appointment type in the list and click the delete button.
Clicking on the appointment type brings up the details for this appointment like the name, the duration (which should be a multiple of the schedule interval we set in the details), the booking span (this is how many of the bookings that this appointment takes up. It should be at least 1 and can not be more than the booking span you set in the details.)
The next check box allows you to limit the patient from scheduling this appointment in the patient portal. And finally the color.
Next is the E-mails. THere are three emails/text that can be sent out when certain events happen. If you leave the email or text blank nothing will be sent. Also there is a patient setting to allow texts and/or emails to be sent. This must be set to allow for the patient to receive the texts or emails.
The confirmation email or text is sent when you create an appointment. It will also add to the end of the email the date and time of the scheduled appointment.
The Reminder email or text is sent automatically at the specified time and days before the appointment. It can also be sent by clicking the send reminder button on the schedule or the individual appointment.
The cancellation email or text is sent when an appointment is cancelled.
Each of the emails have a name, reply to email and subject that can be set. When we create your system, we create a unique email address for you on our system that actually sends out the email. In most cases, when an
email or text is responded to, it will go to the reply to email address.
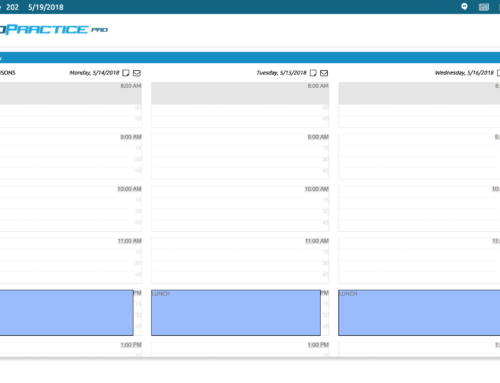
The Final section is the schedule blocks. Setting a block allows you to block off a portion of your schedule for lunch or meetings between your open and closed time.
Blocks are set by either a date range or by a day of the week.
The description is shown on the schedule.
For the date range blocks, you will have the option of a start date, end date and frequency. The Day of week block allows you to choose what day of the week the block will apply to.
Both type allow you to select a start and end time or whether the block is for all day.
You do have the option of allowing appointments to be booked during this block if you click the over schedule check box.
The color for the block can be set as well.
Finally, if you have a block established and you want an exception, you can create an exception to the block by selecting a date. For example, if you have a lunch block every day of the week from 11-12, but on the Wednesday before thanksgiving you are only open to 12. You can make an exception to the lunch block by placing the date for that Wednesday in the exception list.
We’ve covered a lot of ground with the schedules, if you have any questions, send us a support request or email us at info@chiropracticepro.com